|
|
|
Some mods I made to the plumbing in our T-160...
I found a convenient way to winterize the water system. I added a "T" fitting, two valve, and a length of clear reinforced poly hose to the pump intake line. One valve is between the "T" fitting and the tank, the other valve is on the new line just after the "T" fitting.
This hose is the same size as the one that goes from the fresh water tank to the pump. The hose is long enough to fit all the way down into a gallon of RV water line antifreeze, and long enough to reach the dinette table for the reason listed in the next paragraph. I simply place it in the gallon jug, turn the valve tank line valve off and the new hose valve on, and turn the pump on. This sucks the anitfreeze into the pump and pumps it through the lines, and out the faucets and toilet.
An added bonus is that I also use this new line to gravity fill the water tank. I use a clear collapsible 2.5 gallon jug that I fill with water, sit it on the dinette table, push the new hose onto the spout end, open the spout and let the water fill the tank by gravity. I don't have to hold the water jug, it sits on the table. and the collapsible jug simply collapses as the water drains out. No spills, no mess. If using a hard jug, there would have to be a way for air to get into the jug. This sure beats trying to fill through the outside gravity fill, which has rarely been successful.
The outside gravity fill doesn't work well since the fill-point is about the same level as the top of the tank, and the hose between the fill spout and the tank drops slightly, forming a trap effect. The water being poured into the filler has no pressure and cannot force the water through the "trap effect" and into the tank.
|
| |
|

I also made a modification to make the water pump alot quieter. The pump was not installed by Shadow Cruiser according to the pump manufacturer's specifications. These specifications state that there should be a 12 inch flexible hose between the pump outlet and the semi-rigid plumbing pipes. It also states that there should not be a "T" connector within 12 inches of the pump outlet. (Also states a 12" flex on the inlet side as well, and my T-160 did correctly have that, in fact, that is the one I cut for the anti-freeze hose mod mentioned above.
Our T-160 had no flexible tubing on the pump outlet and it has a "T" fitting right at the outlet. I fixed this by adding a 12" reinforced poly tubing bewteen the pump outlet and the "T" fitting. This dramatically reduced the pump noise. I also insulated all the pipes in the unit with foam pipe insulation, to quiet the plumbing and to keep the hot water hot while it travels through the pipes. I used 1/2" unsulation from Home Depot that as self adhesive strips on the slit opening. Very easy to apply and it stays in place.
One other thing about our pump that I discovered is that if the pump drys out due to an almost empty fresh water tank, it vibrates badly and pumps in pulses until it is fully wet inside for awhile. I can only guess that the pump valves dry out and only one or two of the three pumping chambers is pumping efficiently, thus the pulsing. The pump has three pumping chambers to eliminate pulsing of the water. This problem usually occurs after our unit sits for a week with the tank empty.
|
| |
|

I had to replace a cracked gray water tank, it cracked at the mounting flanges from a poorly designed mounting by the factory. The factory replaced the tank under warranty and I did the install. I added a sling underneath the tank to support the tank weight when it is full, which was recommended by the factory. I also added supports on all the tank flanges. The factory supports the tank only on the end flanges, which is a poor design.
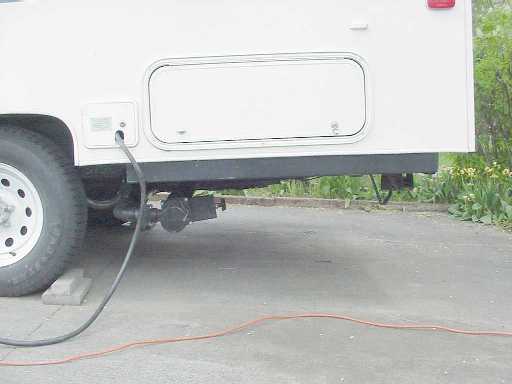
I took the opportunity to relocate the drain plumbing for both gray and black water. The trailer came from the factory with the drain plumbing at the far rear left corner of the trailer. The valves were actualy below the protective scrape bars and thus was always hitting in a deep dip, like coming out of some gas stations, and our own driveway. We had even broken this plumbing off at one time.
I rerouted the plumbing to come out just behind the left wheel, where it is unlikely to scrape anything. I also added a large pipe to the gray water and an extra valve, so that when the gray water tank is full, I can bleed some of the water into this extra capacity pipe to lower the tank water level somewhat. The trailer came with the same setup for the blackwater, so I just duplicated that setup.
I had to add some extra metal framing to use to hang the plumbing straps from and I also put flexible rubber couplings behind the drain valves at the tire and also where the plumbing meets the other drain valves that are adjacent to the black and gray water tanks. This will let the plumbing flex if it hits something and also will make it easier to replace broken plumbing. We do alot of boondocking in the forests and deserts so the plumbing is exposed to hazards more than if a trailer is only used in established campgrounds. |
| |
|
|
|
|
|


